The Ultimate Guide: How to Build Your Own Sauna
Embarking on the journey to build your own sauna, whether choosing a steam room or a custom sauna with a wood-burning stove, offers more than personal relaxation and detoxification; it can also enhance your home's value and lifestyle. This meticulous process involves deciding between an indoor or outdoor sauna, selecting the right sauna door, and choosing the best heat source, such as wood-burning stoves or electric heaters. Each decision shapes a sauna space that not only fulfills your relaxation needs but also integrates seamlessly into your home, creating an inviting retreat.
Understanding the Basics of Sauna Construction
Building a sauna can be a rewarding project, turning a vision of personal wellness into reality. Before embarking on this journey, it’s crucial to familiarize yourself with the fundamental aspects of sauna construction. This includes understanding the different types of saunas available and the materials and tools you will need.
Types of Saunas: Choosing Your Style
When planning your sauna, the first decision you'll face is selecting the type that best suits your preferences, available space, and desired maintenance level. The options include:
- Outdoor saunas: Perfect for those with ample outdoor space, offering a retreat in your backyard.
- Steam saunas: Also known as traditional saunas, they use steam to create a high-humidity environment.
- Dry saunas: Utilize low humidity and high heat, often favored for their simplicity and ease of maintenance.
- Smoke saunas: A traditional Finnish sauna without a chimney; wood is burned in a large stove, and the room is ventilated before use.
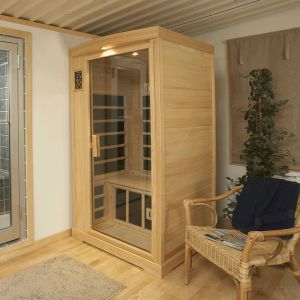
- Freestanding sauna: An all-in-one unit that can be placed indoors or outdoors, ideal for those seeking flexibility.
- Hot tub sauna: Combines the benefits of a sauna with the relaxation of a hot tub, offering a unique experience.
Essential Tools and Materials for Your Sauna Project
To bring your sauna project to fruition, you will need a variety of tools and materials. Key items include:
- Aluminum vapor barrier: Essential for maintaining the proper climate inside your sauna and preventing moisture damage.
- Sauna benches: A must-have for comfort and relaxation; they can be custom-built to fit your sauna's dimensions.
- Interior walls: Typically constructed from cedar or another wood suitable for high temperatures and humidity.
- Bare wall studs: The skeleton of your sauna, providing the structure onto which the interior walls and insulation are mounted.
- Insulation: Vital for retaining heat and ensuring your sauna heats up efficiently.
Deciphering the Blueprint: Designing Your Sauna Layout
Creating the perfect sauna starts with a well-thought-out design. This phase is crucial for ensuring that your sauna not only fits within your available indoor space but also provides the optimal traditional sauna experience. Whether you’re building a sauna from scratch or utilizing a sauna kit, understanding the layout is the first step to bringing your vision to life.
Dimension Guidelines and Spatial Considerations
When planning your home sauna, the dimensions and spatial arrangement play a significant role in the overall functionality and comfort of your sauna session. A typical sauna might require at least 7 feet in height to accommodate standing users comfortably, while the length and width will depend on the number of people using the sauna at one time.
Ensuring there’s enough room for the heating unit while maintaining a safe distance from sauna users is essential. Careful consideration of the indoor space available and how it will influence your build-a-sauna project can make or break the usability of your own sauna.
Ventilation and Insulation: Keeping Your Sauna Comfortable
A successful sauna design incorporates effective ventilation and insulation, key components that directly impact your sauna session. Proper ventilation ensures a steady flow of air, essential for both comfort and safety, allowing for an even distribution of heat within the sauna.
Insulation, on the other hand, is critical for retaining heat, typically installed between the ceiling joists and wall studs to keep the warmth generated by the wood burning or other types of heating units inside the sauna. Together, these elements ensure your sauna maintains the desired temperature efficiently, providing a traditional sauna experience every time.
Obtaining Building Permits: Navigating the Legal Landscape
Before diving into the construction of your own sauna, it's crucial to understand the legal requirements, including the necessity of obtaining building permits. This step is often overlooked but is paramount to ensuring your sauna project complies with local codes and regulations, safeguarding not only your investment but also your safety.
When and Why You Need a Permit for Your Sauna?
You'll likely need a building permit for your sauna if you're making structural changes to your home or adding significant electrical or plumbing work, such as installing infrared heaters or a new gas pipe. The specifics can vary based on your location, so checking with your local building department is essential. Obtaining a permit is necessary when your project involves more than just cosmetic updates, especially if you're converting a spare room into a dry sauna or adding a new structure to your property.
The rationale behind securing a building permit for your sauna extends beyond mere regulatory compliance. These permits ensure that your sauna design meets safety standards, potentially preventing hazards related to improper installation of vapor barriers, wall insulation, or electrical components. Moreover, they can protect you from future legal and insurance issues, making sure your home sauna or spa membership alternative brings health benefits without unforeseen complications.
Step-by-Step Guide to Securing Your Building Permit
- Research Local Requirements: Start by contacting your local building department to gather information on the specific requirements for a sauna project. This can include zoning laws, construction codes, and necessary documentation.
- Prepare Your Application: Compile all required documents, which may include detailed plans of the sauna layout, showing the location of the upper bench, infrared heaters, and any structural changes like wall insulation or vapor barriers. Include details about ventilation and any electrical or plumbing modifications.
- Submit Your Application: Once you have all your paperwork in order, submit your application to the local building authority. This may also require paying a fee, which varies depending on your location and the scope of your project.
- Schedule an Inspection: After your application is reviewed, you might need to schedule an inspection to ensure your plans comply with local regulations. This is especially important for projects that involve significant modifications, like installing a gas pipe or ensuring there's enough room for safety clearances.
- Receive Approval: If your project meets all requirements, you’ll receive your building permit. Keep in mind, you may need to schedule further inspections during or after construction to ensure compliance with the approved plans.
Laying the Foundation: Preparing Your Sauna Site
The initial step in building your own sauna is to properly lay the foundation, ensuring a stable and efficient structure. This process is critical, as it supports the entire sauna, influencing its durability and functionality.
Selecting the Perfect Location
Choosing the right location for your sauna is pivotal. For outdoor saunas, look for a spot that’s easily accessible yet offers privacy. The location should accommodate the sauna's dimensions, being at least seven feet tall to ensure proper ventilation.
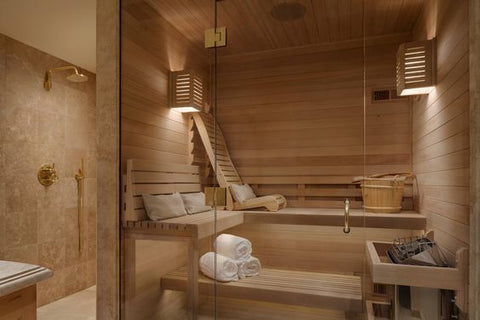
For indoor saunas, consider using a room with easy access to a power source for the heat source and electrical wiring. The inclusion of tempered or double-paned glass on the opposite wall can enhance the sauna experience by adding a visual element while maintaining insulation.
Groundwork and Base Construction: Ensuring Stability
Once the location is selected, the next step is preparing the groundwork and constructing a stable base. For outdoor saunas, this might involve leveling the ground and laying a foundation that’s at least three inches above the surrounding area to prevent moisture ingress.
Indoor saunas require ensuring the flooring can support the weight of the sauna, considering the heat source, benches, and any additional features like a space for essential oils. Proper preparation of the base is crucial for the sauna's longevity, ensuring it remains a safe and enjoyable space for relaxation.
The Framework: Erecting Your Sauna's Structure

After laying a solid foundation for your sauna, the next crucial step is constructing the framework. This stage sets the structural integrity of your sauna, ensuring it can withstand the dry heat and provide a lasting retreat for relaxation.
Building the Walls and Ceiling: Techniques and Tips
The walls and the ceiling form the core enclosure of your sauna, keeping the dry heat contained and ensuring your sauna efficiently helps relieve tension and soothe sore muscles. Begin with the back wall and proceed to the side walls, ensuring all are securely attached to the concrete foundation or the floor of your existing space.
The only difference in constructing indoor versus outdoor saunas might be the materials used, but the principle remains the same: create a tight, insulated environment. When building the ceiling, make sure it is high enough to allow comfortable standing but not so high that it compromises the sauna's ability to maintain heat.
Door and Window Installation: Creating Access and Light
Installing the door and any windows is not just about creating access and letting in light; it's also about maintaining the sauna's heat efficiency. For the door, consider using a material that withstands high temperatures and seals tightly when closed. A window, if desired, should be placed on a wall opposite the air inlet to promote proper ventilation. Using double-paned glass can help retain heat while allowing natural light to enhance the sauna experience.
Properly installing these elements ensures that your sauna remains a sanctuary for dry heat therapy, aiming to relieve tension and soothe sore muscles in a serene, well-lit environment.
Interior Finishing Touches: From Bench to Heater
With the structure of your sauna erected, it’s time to focus on the interior finishing touches that transform it from a mere room to a functional and relaxing sauna space. This stage is where comfort meets functionality, with every element, from the benches to the heater, playing a crucial role in enhancing the sauna experience.
Choosing Your Sauna Heater: Electric vs. Wood-Burning
The choice between an electric and a wood-burning heater is significant, as it affects not just the ambiance of your sauna but also operational efficiency and cost. Electric heaters, known for their convenience, adhere strictly to safety standards and can save money in the long run on fuel. They require adherence to the manufacturer's instructions for installation, especially regarding clearance from building materials, to prevent hazards.
Wood-burning heaters, on the other hand, offer a traditional experience and the ability to throw water on the rocks to increase humidity. However, they may require more effort in terms of installation and obtaining cold water access for safety.
Installing Benches and Flooring: Comfort Meets Functionality
Benches and flooring are essential for ensuring your sauna is a comfortable retreat. Benches should be at least two feet wide to allow users to lie down comfortably and be positioned at different levels to offer various temperature zones within the sauna. The use of standard fiberglass or fiberglass batt insulation under the benches can help maintain heat at floor level, enhancing the overall efficiency of the sauna.
When selecting building materials for the flooring, consider ease of cleaning and the ability to withstand the hot, humid conditions typical of a sauna environment. Proper installation following safety standards ensures a safe, enjoyable, and functional sauna experience.
Wiring Your Sauna: Electrical Safety and Standards
Ensuring your sauna's electrical wiring adheres to safety standards is crucial for both functionality and peace of mind. Whether you’re incorporating an electric heater or ensuring easy access for lighting and other amenities, navigating the electrical aspects of building a sauna requires careful planning and execution.
Hiring a Professional vs. DIY: What You Need to Know
When it comes to electrical work, understanding the difference between tasks suited for DIY enthusiasts and those requiring professional expertise is essential. Individuals can safely manage some aspects of sauna construction, such as assembling wood for walls or installing two benches, but electrical work often requires a professional. This is due to the high temperatures and specific safety standards involved.
A professional electrician can ensure that all wiring is correctly installed and insulated, reducing the risk associated with heat and moisture, as well as the potential for electrical hazards when throwing water on sauna stones.
Connecting Your Heater: A Step-by-Step Guide
By following these steps, you can ensure that your sauna's heater is connected safely and under all necessary electrical standards, contributing to a secure and enjoyable sauna experience.
- Choose the Right Location: Your heater should be positioned to allow for even distribution of heat throughout the sauna, typically centered along one of the walls for optimal performance.
- Follow Manufacturer’s Instructions: Every heater will come with specific installation guidelines that must be adhered to, ensuring both safety and efficiency. This includes minimum clearance from the walls and the ceiling, as well as proper grounding.
- Install a Dedicated Circuit: Saunas require a lot of power, especially at high temperatures. Install a dedicated circuit from your home's electrical panel to the sauna, ensuring it can handle the heater’s load without overloading your system.
- Use Proper Wiring: High-temperature wiring is a must for any connections within the sauna space. This type of wiring resists degradation over time, even with the heat the sauna generates.
- Install a GFCI Breaker: For additional safety, install a Ground Fault Circuit Interrupter (GFCI) breaker on the sauna’s circuit. This device will automatically cut power if it detects any fault, such as moisture coming into contact with electricity, which is a possibility when throwing water on the sauna stones.
- Test Before Use: Once everything is connected, test your sauna’s electrical system before its first use to ensure everything is working correctly and safely. This might include checking the heater, lights, and any other electrical components installed in your sauna.
The Aesthetic Touch: Interior Design and Lighting
The interior design and lighting of your indoor sauna go beyond mere functionality, playing a crucial role in defining the ambiance and enriching the overall experience. By incorporating these aesthetic elements, you transform a basic sauna room kit into a personal retreat, fostering an atmosphere of relaxation and reflection.
Selecting Lighting Fixtures: Setting the Mood
The right lighting can transform your sauna into a tranquil oasis. Opting for soft, dimmable lights allows you to adjust the brightness to suit your mood or time of day. Installing fixtures behind tempered glass can add to the ambiance while protecting the lights from the high heat and moisture typical of a sauna environment. This thoughtful selection of lighting not only sets the mood but also enhances the safety and durability of your sauna's electrical components.
Decorative Elements: Personalizing Your Space
Personalizing your sauna with decorative elements can elevate the experience from simply taking a sauna to enjoying a moment of luxury. Consider adding unique sauna benches made from high-quality wood that complement the sauna's interior, or incorporate accessories that enhance the sauna's functionality while adding to its aesthetic appeal. The use of natural materials, like wood and stone, can harmonize with the heat source to create a cohesive and inviting space. These personal touches make your sauna an extension of your home, reflecting your style and enhancing relaxation.
In summary

Throughout this guide, we've navigated the essential steps to building your sauna, from selecting the perfect location and laying a solid foundation to choosing the right materials and optimizing heat management. Each phase of this journey not only brings you closer to realizing your dream of a personal steam room or dry sauna but also offers the satisfaction of creating something truly unique with your own hands.
Personal saunas offer a sanctuary for relaxation and health benefits, whether you fuel them with wood-burning stoves or another type of heat source. The process of building a sauna, from burning a sauna kit to installing sauna benches behind tempered glass, is as rewarding as enjoying the final product. The sense of achievement that comes with completing a DIY sauna project is unmatched, offering a special place to unwind and potentially improving your well-being.
Take the first step towards planning your sauna project today and transform your vision into a warm, inviting retreat that you can call your own.